导语:之前写过一个工具箱,里面的用户模块除了注册登录这一种方式外,还增加了一个第三方登录的功能,现在就这个实现的方法做一个说明和总结。
# 目录
- 概念
- 原理
- 实现
# 概念
随着互联网的蓬勃发展,越来越多的网站和应用出现,大量的用户活跃在这些网站和应用中,但是其中一些网站和应用逐渐做大做强,拥有了海量的用户群体,也相应的推出了开发者服务。
它们提供了第三方登录的服务,开发者只需要在这个服务商那里注册一个账号,填写一些自己网站的信息,获取id和key等值,就可以使用这些网站的用户账号登录自己的网站,非常的方便快捷,省去了相关的开发任务。
如果你的网站不想构建自己的用户体系,或者说不想写登录注册等功能的话,可以使用第三方登录来跳过这一步骤,省时省力。
不过很多网站虽然是第三方登录,但是还是作为一个绑定账号来看待的,即是你使用了第三方账号,也会让你绑定手机号和邮箱等信息。
这里列表了一些常见的第三方登录平台的开发文档,以供参考。
- QQ (opens new window)
- 微信 (opens new window)
- 微博 (opens new window)
- 支付宝 (opens new window)
- Github (opens new window)
- Gitee (opens new window)
# 原理
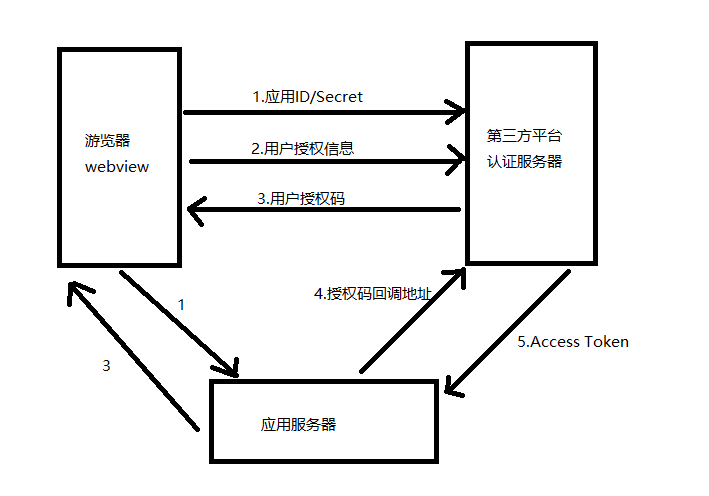
第三方登录的服务商遵循OAuth (opens new window)协议,这是一种开放协议,允许以简单和标准的方法从 Web、移动和桌面应用程序进行安全授权。
OAuth是一种从应用程序访问受保护数据的方法,它比要求用户使用密码登录更安全,让网站应用程序开发人员无需共享密码即可安全地访问第三方平台的用户数据。
在这里我简单画了个草图说明一下日常的登录流程。
下面以github为例,讲解一下具体的流程。
# 前端页面
当一个用户进入你的网站后,点击github图标或者文字链接,这时候会跳转到GitHub的账号授权页面请求授权,授权成功后,携带者授权码重定向到到回调地址。
如果没有登录过,则跳转到授权页面;如果已经授权过,则带着授权码重定向到到回调地址。
下面是GitHub的授权地址和参数:
- 请求方式是:
get, - 请求授权地址是:
https://github.com/login/oauth/authorize, - 请求参数是:
| 姓名 | 类型 | 描述 |
|---|---|---|
| client_id | string | 必填,客户端ID |
| redirect_uri | string | 必填,您的应用程序中的URL |
| login | string | 建议用于登录和授权应用程序的特定帐户 |
| scope | string | 以空格分隔的范围列表 |
| state | string | 一个不可猜测的随机字符串,它用于防止跨站点请求伪造攻击。 |
| allow_signup | string | 在 OAuth 流程期间,是否会为未经身份验证的用户提供注册GitHub的选项 |
# 后端处理
当重定向到页面后,带着授权码向后端服务器发起请求,获取访问令牌,通过访问令牌,来请求第三方网站的Open API,获取用户信息。
下面是GitHub的请求地址和参数:
- 请求方式是
post, - 请求头是:
{
    headers: {
        "Accept": 'application/json',
    },
}
2
3
4
5
- 请求地址是:
https://github.com/login/oauth/access_token, - 请求参数是:
| 姓名 | 类型 | 描述 |
|---|---|---|
| client_id | string | 必填,客户端ID。 |
| client_secret | string | 必填,客户端密钥。 |
| code | string | 必填,授权码 |
| redirect_uri | string | 必填,授权后发送用户的应用程序中的URL |
获取成功后会返回以下数据。
{
    "access_token":"gho_16C7e42F292c6912E7710c838347Ae178B4a",
    "scope":"repo,gist",
    "token_type":"bearer"
}
2
3
4
5
# 获取用户信息
拿到访问令牌后,就可以调用第三方平台的API获取自己需要的数据,然后就可以允许用户登录进自己的网站使用了。
下面是GitHub的请求地址和参数:
- 请求方式是
get, - 请求头是:
{
    headers: {
        "Authorization": 'Bearer OAUTH-TOKEN',
    },
}
2
3
4
5
- 请求地址是:
https://api.github.com/user, - 请求参数是:
access_token,
这样就可以获取用户的信息,执行后面的过程了。
# 实现
下面还是以GitHub为例,来实现以下具体的登录过程。
# 注册应用
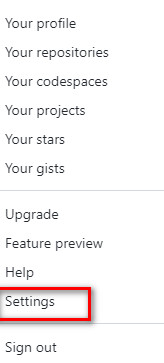
登录GitHub,到右上角我的找到setting
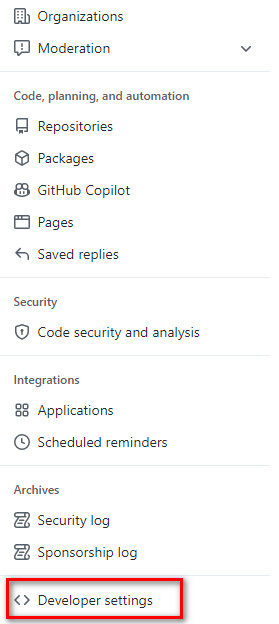
找到Developer settings
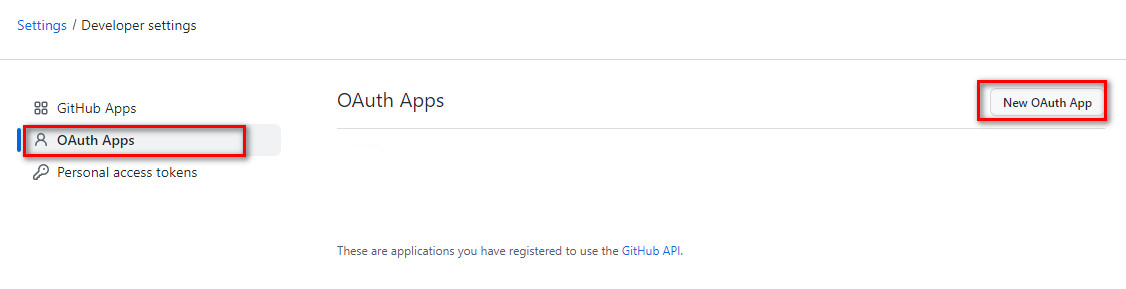
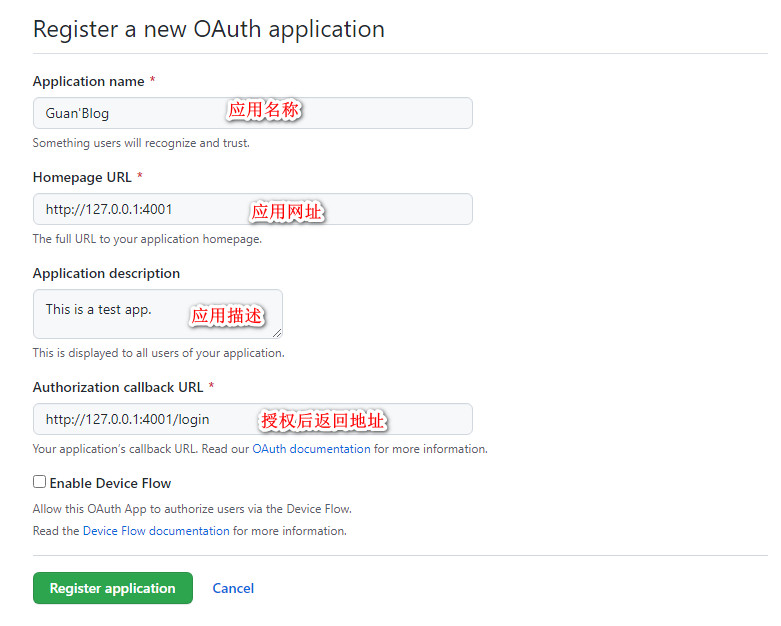
点击OAuth Apps,再点击New OAuth App按钮。
填写你的网站应用一些信息,点击注册应用按钮就可以了。
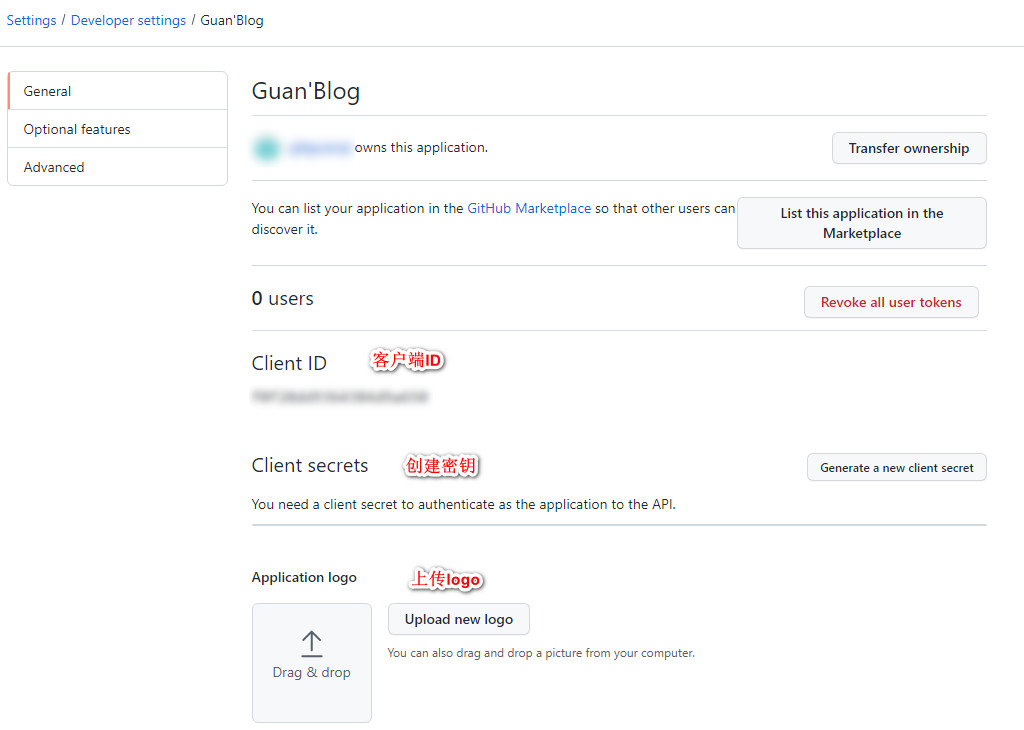
这样就创建成功了,你可以上传一下头像,然后创建一个密钥。
# 编写授权页面
- 启动一个express项目
express --view=ejs third
cd third
npm install
2
3
- 更改端口
找到bin/www文件,该端口为4001!
- 启动服务
npm start
- 创建前端页面
cd public
在public新建一个index.html。
<h2>第三方登录案例</h2>
<p>
    <a href="https://github.com/login/oauth/authorize?client_id=f0f28dd9364384d9a650&redirect_uri=http://127.0.0.1:4001/login"
        target="_blank" title="Github登录">
        <img src="/img/third-github.png" alt="Github登录">
    </a>
</p>
<p id="user"></p>
2
3
4
5
6
7
8
p {
    display: flex;
    align-items: center;
}
img {
    margin-right: 10px;
    display: inline-block;
    width: 30px;
    height: 30px;
}
2
3
4
5
6
7
8
9
10

- 点击授权
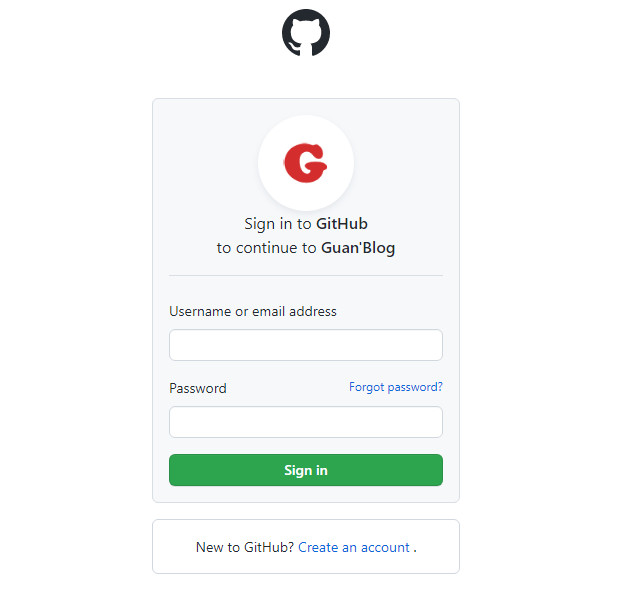
点击链接后会跳转到GitHub的授权页面,如果没有登录GitHub会提示你请登录GitHub。
登录以后会跳转到github授权页面。
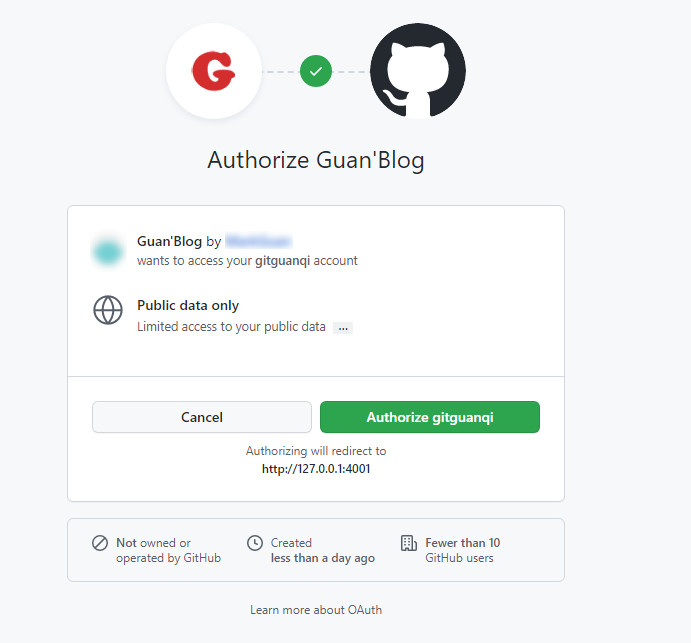
- 取消授权
如果你点击取消授权,会返回主页,url如下:
http://127.0.0.1:4001/?error=access_denied&error_description=The+user+has+denied+your+application+access.&error_uri=https%3A%2F%2Fdocs.github.com%2Fapps%2Fmanaging-oauth-apps%2Ftroubleshooting-authorization-request-errors%2F%23access-denied
可以写一个js处理以下这个返回的信息。
// api.js
function getParams () {
    let search = location.search && location.search.indexOf('?') > -1 ? location.search.split('?')[1] : '',
    params = {};
    if (search) {
        search = search.split('&');
    }
    if (search && search.length) {
        for (const item of search) {
            let kv = item.split('=');
            if (kv[0] == 'error_description') {
                kv[1] = kv[1].replace(/\+/gi, ' ');
            }
            params[kv[0]] = kv[1];
        }
    }
    return params;
}
2
3
4
5
6
7
8
9
10
11
12
13
14
15
16
17
18
// 获取参数
let params = getParams();
if (search && params.error == "access_denied") {
    alert('用户取消授权,请重试!');
    setTimeout(() => {
        location.href = '/';
    }, 1000);
}
2
3
4
5
6
7
8
- 授权成功
如果你允许授权的话,会重定向到登录页面,url如下:
http://127.0.0.1:4001/login/?code=1a0fbfa34e2aaab20cd6
再写一个login页面。
<p>登录中...</p>
- 获取授权码
通常这个获取访问令牌的操作是放在后端去完成的,为了保护密钥隐私。
// 获取参数
let params = getParams();
if (params && params.code) {
    location.href = '/user/auth?code='+params.code;
}
2
3
4
5
- 后端接口处理
修改app.js地址。
// app.use('/users', usersRouter);
app.use('/user', usersRouter);
2
在routes/users.js新建一个请求处理。
var axios = require('axios');
var config = {
  client_id: 'xxxxxxxxxx',
  client_secret: 'xxxxxxxxxxxxxxxxxxxxxxxxxxxx',
  redirect_uri: 'http://127.0.0.1:4001/login',
}

router.get('/auth', async function (req, res) {

  // 授权码
  let code = req.query.code;
  if (code) {
    let params = {...config};
    params.code = code;

    // 请求访问令牌
    let data = await axios({
      method: 'post',
      url: 'https://github.com/login/oauth/access_token',
      headers: {
        accept: 'application/json',
      },
      data: params,
    });

    // 请求用户信息
    let token = data.data;
    console.log('token: ', token);

    if (token) {
      let result = await axios({
        method: 'get',
        url: 'https://api.github.com/user',
        headers: {
          'Authorization': `Bearer ${token.access_token}`,
        }
      })

      // 返回用户信息
      if (result) {
        let userInfo = result.data;
        console.log('user: ', result);
        res.redirect(`/login?name=${userInfo.name}&avatar_url=${userInfo.avatar_url}`);
      }

    }
  }

});
2
3
4
5
6
7
8
9
10
11
12
13
14
15
16
17
18
19
20
21
22
23
24
25
26
27
28
29
30
31
32
33
34
35
36
37
38
39
40
41
42
43
44
45
46
47
48
49
当第一个axios请求成功后,会打印出令牌信息,如下:
{
  "access_token": "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",
  "token_type": "bearer",
  "scope": "user"
}
2
3
4
5
请求失败会打印出以下:
{
  "error": "bad_verification_code",
  "error_description": "The code passed is incorrect or expired.",
  "error_uri": "https://docs.github.com/apps/managing-oauth-apps/troubleshooting-oauth-app-access-token-request-errors/#bad-verification-code"
}
2
3
4
5
第二个axios请求成功后会打印出:
{
    data: {
        login: 'xxxx',
        id: 1111111,
        node_id: 'xxxx',
        avatar_url: 'https://avatars.githubusercontent.com/u/xxxxx?v=4',
        gravatar_id: '',
        url: 'https://api.github.com/users/xxxx',
        html_url: 'https://github.com/xxxx',
        followers_url: 'https://api.github.com/users/xxxx/followers',
        following_url: 'https://api.github.com/users/xxxx/following{/other_user}',
        gists_url: 'https://api.github.com/users/xxxx/gists{/gist_id}',
        starred_url: 'https://api.github.com/users/xxxx/starred{/owner}{/repo}',
        subscriptions_url: 'https://api.github.com/users/xxxx/subscriptions',
        organizations_url: 'https://api.github.com/users/xxxx/orgs',
        repos_url: 'https://api.github.com/users/xxxx/repos',
        events_url: 'https://api.github.com/users/xxxx/events{/privacy}',
        received_events_url: 'https://api.github.com/users/xxxx/received_events',
        type: 'User',
        site_admin: false,
        name: 'xxxx',
        company: null,
        blog: 'https://xxxx.xx/',
        location: 'xxxx',
        email: null,
        hireable: null,
        bio: 'xxxxxx',
        twitter_username: null,
        public_repos: 0,
        public_gists: 0,
        followers: 0,
        following: 0,
        created_at: 'xxxx-xx-10T06:19:38Z',
        updated_at: 'xxxx-xx-21T08:19:56Z',
        private_gists: 0,
        total_private_repos: 0,
        owned_private_repos: 0,
        disk_usage: 233342,
        collaborators: 0,
        two_factor_authentication: true,
        plan: {
        name: 'free',
        space: 00000,
        collaborators: 0,
        private_repos: 00000
        }
    }
}
2
3
4
5
6
7
8
9
10
11
12
13
14
15
16
17
18
19
20
21
22
23
24
25
26
27
28
29
30
31
32
33
34
35
36
37
38
39
40
41
42
43
44
45
46
47
48
- 渲染页面
在登录页面增加判断方法,存储用户信息。
let params = getParams();
if (params.name) {
    let userInfo = {
        name: params.name,
        avatar: params.avatar_url,
    }
    localStorage.setItem('userInfo', JSON.stringify(userInfo));
    location.href = '/';
}
2
3
4
5
6
7
8
9
在首页获取用户信息显示。
let userInfo = localStorage.getItem('userInfo'),
login = document.getElementById('login'),
user = document.getElementById('user');
userInfo = JSON.parse(userInfo);
if (userInfo) {
    user.innerHTML = `
        <img src="${userInfo.avatar}" title="${userInfo.name}" alt="${userInfo.name}"/>
        <span>欢迎您:${userInfo.name}</span>
    `;
    login.style.display = 'none';
} else {
    user.innerHTML = '';
    login.style.display = 'block';
}
2
3
4
5
6
7
8
9
10
11
12
13
14
以上就是GitHub第三方登录的开发流程,有兴趣的可以自己根据文章实现体验一下。
# 写在最后
以上就是第三方登录的实践和总结,其他第三方登录平台也是如此,只不过地址和参数稍微不一样罢了。


