导语:之前做过一个小项目,其中用到了图形验证码,邮箱和手机号注册登录,这三者基本上是现在网站常用的验证方法,现在就做一个使用操作总结。
# 目录
- 准备工作
- 原理解析
- 方法总结
- 在线体验
# 准备工作
# 安装依赖包
继续打开上次新建的demo文件夹,下载几个依赖包。
npm install svg-captcha nodemailer tencentcloud-sdk-nodejs --save
- svg-captcha 可以创建图形验证码
- nodemailer 可以发送电子邮件
- tencentcloud-sdk-nodejs 可以发送短信
# 申请准备
除了图形验证码可以安装后直接使用外,其他两个必须向邮箱服务商和云计算运营商申请授权密钥。
# 电子邮件申请方法
推荐网站:
QQ邮箱申请步骤:
打开QQ邮箱 (opens new window)登录进去;
点击设置,然后打开账户选项卡,点击开启POP3/SMTP服务;

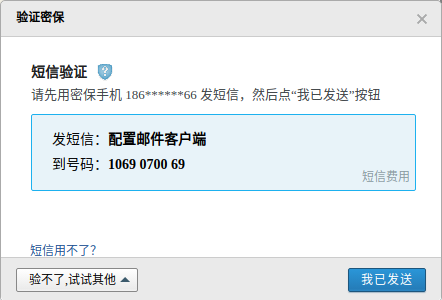
- 点击生成授权码,发送短信,点击我已发送,复制授权码到一个记事本里面去;

发送邮件服务器:smtp.qq.com,使用SSL,端口号465或587
网易邮箱申请步骤:
打开163邮箱 (opens new window)登录进去;
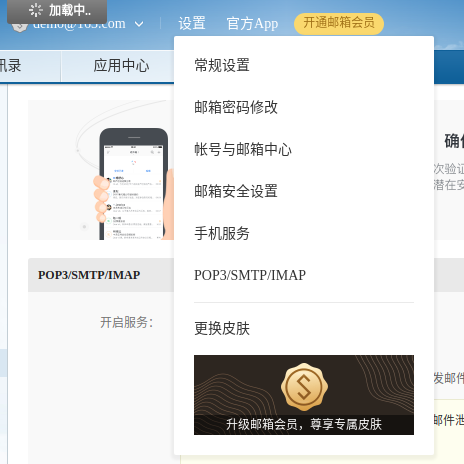
点击设置,然后打开设置选项卡,点击POP3/SMTP/IMAP;


- 点击开启POP3/SMTP服务,发送短信,点击我已发送,复制授权码到一个记事本里面去;


# 手机短信申请方法
本次使用的是腾讯云提供的短信服务。
- 打开腾讯云官网 (opens new window)注册登录进去;
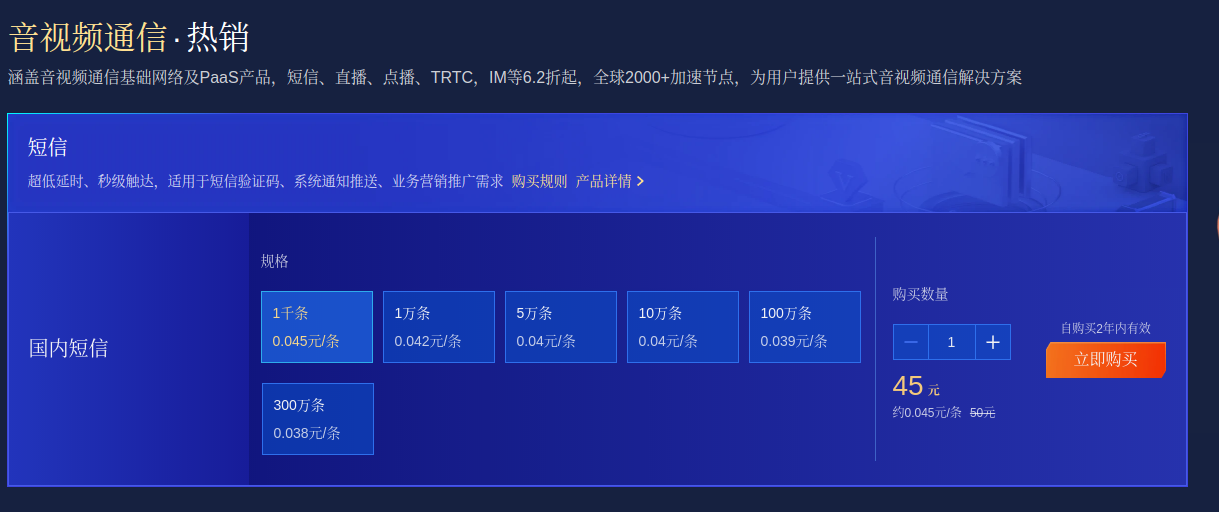
- 打开短信产品页面 (opens new window),现在是618活动期间,购买短信,大约1000条,38元;

- 然后点击控制台到短信控制台页面 (opens new window)查看短信套餐;

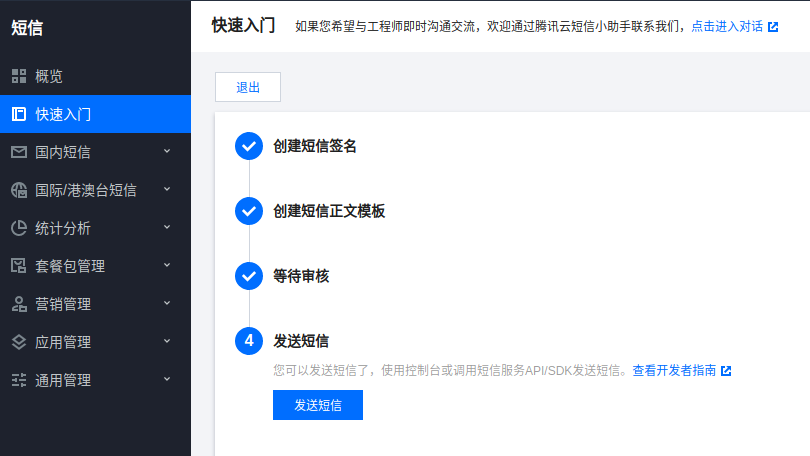
- 接下来就是短信开通配置,参考这篇文章国内短信快速入门 (opens new window);

按照上面操作完成后,你可以得到应用id和模板id。
到此,这个整个申请流程就结束了。
# 原理解析
基本上几个验证方式都大同小异,可以共同归纳为以下几个步骤:
- 创建/发送验证码内容
- 验证是否正确
下面具体描述一下这个步骤。
# 创建/发送验证码内容
- 图形验证码
当我们去请求一个api地址的时候,首先引入依赖包,配置好参数,生成一个svg格式的图形,然后响应请求,发送svg数据,就可以看到一个N位字符的图片了。
- 邮箱验证码
到引入邮箱依赖包,配置好参数,然后去调用发送邮件方法,最后打开请求发送的邮箱账户,就可以看到一封电子邮件。
- 手机
到引入手机依赖包,配置好参数,然后去调用发送短信方法,最后打开请求发送的手机短信app,就可以看到一条短信了。
# 验证是否正确
- 客户端提交参数;
- 服务端检测是否输入正确,返回提示信息;
# 方法总结
本小节主要是封装一些常用的方法,然后编写脚本文件。
打开demo文件夹,创建一个captcha的文件夹,然后新建config.js,主要是放置一些配置信息;新建一个api.js,主要是放置一些常用方法。
然后新建svg,email,phone三个文件夹,并且各自新建index.js文件。
get请求方式用于发送验证码,post请求方式用于验证验证码。
# 常用方法
打开config.js文件:
// 图形,邮箱,手机的验证码
const svg = {
    size: 4, // 验证码长度
    ignoreChars: '012oOiILl', // 验证码字符中排除 0o1i
    noise: 1, // 干扰线条的数量
    fontSize: 52,
    color: true, //开启文字颜色
    // background:"#000",//背景色
    width: 200,
    height: 80,
    time: 2*60,
}

const email = {
    service: 'qq',
    port: 465,
    secure: true,
    user: 'xxx@xx.com',
    pass: 'xxxxxxxxxxxxxx',
    from: 'xxx@xx.com',
    time: 2*60,
}

const phone = {
    secretId: 'XXXXXXXXXXXXXXXXXXXXXXXXXXXXXXXX',
    secretKey: 'XXXXXXXXXXXXXXXXXXXXXXXXXXXXXXXX',
    reqMethod: "POST",
    reqTimeout: 30,
    endpoint: "sms.tencentcloudapi.com",
    signMethod: "HmacSHA256",
    region: "ap-shanghai",
    SmsSdkAppid: "XXXXXXX", // 应用id
    Sign: "DEMO",
    ExtendCode: "",
    SenderId: "",
    SessionContext: "",
    TemplateID: {
        eg: "XXXXXX",
    },
    time: 2*60,
}

module.exports = {
    svg,
    email,
    phone
}
2
3
4
5
6
7
8
9
10
11
12
13
14
15
16
17
18
19
20
21
22
23
24
25
26
27
28
29
30
31
32
33
34
35
36
37
38
39
40
41
42
43
44
45
46
47
打开api.js文件:
- 检测方法
//一个检测验证码是否正确的方法;
/*
*infoType 检测类型: svg,email,phone
*codeInfo 服务端的验证码 session信息
*verifyInfo 客户端提交的验证码信息
*/
function check (res, req, infoType, codeInfo, verifyInfo) {
    let type = infoType == 'svg' ? 'svgInfo' :
    infoType == 'email' ? 'emailInfo' : 'phoneInfo';
    let typeText = infoType == 'svg' ? '图形' :
    infoType == 'email' ? '邮箱' : '手机';
    if (!Object.keys(codeInfo).length) {
        return res.json({
            code: 101,
            msg: 'get_fail',
            data: {
                info: `请重新获取${typeText}验证码!`
            }
        })
    }
    if (infoType != 'phone') {
        codeInfo.code = codeInfo.code.toLowerCase();
    }
    if (!verifyInfo.code) {
        return res.json({
            code: 101,
            msg: 'get_fail',
            data: {
                info: `${typeText}验证码不能为空!`
            }
        })
    }
    if (infoType == 'email' ||
    infoType == 'phone') {
        if (!verifyInfo[infoType]) {
            return res.json({
                code: 101,
                msg: 'get_fail',
                data: {
                    info: `${typeText}不能为空!`
                }
            })
        }
        if (verifyInfo[infoType] != codeInfo[infoType]) {
            return res.json({
                code: 101,
                msg: 'get_fail',
                data: {
                    info: `${typeText}账号错误!`
                }
            })
        }
    }
    if (codeInfo.isVerify == 1) {
        return res.json({
            code: 101,
            msg: 'get_fail',
            data: {
                info: `${typeText}验证码已经验证!`
            }
        })
    }
    if (((verifyInfo.time - codeInfo.time)/1000) > 60) {
        return res.json({
            code: 101,
            msg: 'get_fail',
            data: {
                info: `${typeText}验证码已经过期!`
            }
        })
    }
    if (verifyInfo.code != codeInfo.code) {
        return res.json({
            code: 101,
            msg: 'get_fail',
            data: {
                info: `${typeText}验证码错误!`
            }
        })
    }
    req.session[type].isVerify = 1;
    return res.json({
        code: 200,
        msg: 'get_succ',
        data: {
            info: `${typeText}验证码验证成功!`
        }
    })
}
2
3
4
5
6
7
8
9
10
11
12
13
14
15
16
17
18
19
20
21
22
23
24
25
26
27
28
29
30
31
32
33
34
35
36
37
38
39
40
41
42
43
44
45
46
47
48
49
50
51
52
53
54
55
56
57
58
59
60
61
62
63
64
65
66
67
68
69
70
71
72
73
74
75
76
77
78
79
80
81
82
83
84
85
86
87
88
89
- 发送邮件信息
const nodemailer = require('nodemailer');
const emailConfig = require('./config').email;
// option 配置参数
function sendMail (res, option) {
    let transporter = nodemailer.createTransport({
        service: emailConfig.service,
        port: 465,
        secureConnection: true,
        auth: {
            user: emailConfig.user,
            pass: emailConfig.pass
        }
    })
    return transporter.sendMail(option, (error, info) => {
        if (error) {
            return res.json({
                code: 101,
                msg: 'get_fail',
                data: {
                    info: '发送失败,请重试!',
                    des: error
                }
            })
        } else {
            return res.json({
                code: 200,
                msg: 'get_succ',
                data: {
                    info: '发送成功,请注意查收!'
                }
            })
        }
    })
}
2
3
4
5
6
7
8
9
10
11
12
13
14
15
16
17
18
19
20
21
22
23
24
25
26
27
28
29
30
31
32
33
34
- 发送手机短信
/*
* phoneNo 手机号
* type 模板类型
* phoneCode 6位数字验证码
*/
const tencentcloud = require('tencentcloud-sdk-nodejs');
const phoneConfig = require('./config').phone;

function sendSms (phoneNo, type, phoneCode) {
    // 导入对应产品模块的client models。
    const smsClient = tencentcloud.sms.v20190711.Client

    /* 实例化要请求产品(以sms为例)的client对象 */
    const client = new smsClient({
        credential: {
            /* 必填:腾讯云账户密钥对secretId,secretKey。
             * 这里采用的是从环境变量读取的方式,需要在环境变量中先设置这两个值。
             * 你也可以直接在代码中写死密钥对,但是小心不要将代码复制、上传或者分享给他人,
             * 以免泄露密钥对危及你的财产安全。
             * CAM密匙查询: https://console.cloud.tencent.com/cam/capi */
            secretId: phoneConfig.secretId,
            secretKey: phoneConfig.secretKey,
        },
        /* 必填:地域信息,可以直接填写字符串ap-guangzhou,或者引用预设的常量 */
        region: phoneConfig.region,
        /* 非必填:
         * 客户端配置对象,可以指定超时时间等配置 */
        profile: {
            /* SDK默认用TC3-HMAC-SHA256进行签名,非必要请不要修改这个字段 */
            signMethod: phoneConfig.signMethod,
            httpProfile: {
                /* SDK默认使用POST方法。
                 * 如果你一定要使用GET方法,可以在这里设置。GET方法无法处理一些较大的请求 */
                reqMethod: phoneConfig.reqMethod,
                /* SDK有默认的超时时间,非必要请不要进行调整
                 * 如有需要请在代码中查阅以获取最新的默认值 */
                reqTimeout: phoneConfig.reqTimeout,
                /**
                 * SDK会自动指定域名。通常是不需要特地指定域名的,但是如果你访问的是金融区的服务
                 * 则必须手动指定域名,例如sms的上海金融区域名: sms.ap-shanghai-fsi.tencentcloudapi.com
                 */
                endpoint: phoneConfig.endpoint
            },
        },
    })

    /* 请求参数,根据调用的接口和实际情况,可以进一步设置请求参数
     * 属性可能是基本类型,也可能引用了另一个数据结构
     * 推荐使用IDE进行开发,可以方便的跳转查阅各个接口和数据结构的文档说明 */
    const smsParams = {
        /* 短信应用ID: 短信SdkAppid在 [短信控制台] 添加应用后生成的实际SdkAppid,示例如1400006666 */
        SmsSdkAppid: phoneConfig.SmsSdkAppid,
        /* 短信签名内容: 使用 UTF-8 编码,必须填写已审核通过的签名,签名信息可登录 [短信控制台] 查看 */
        Sign: phoneConfig.Sign,
        /* 短信码号扩展号: 默认未开通,如需开通请联系 [sms helper] */
        ExtendCode: phoneConfig.ExtendCode,
        /* 国际/港澳台短信 senderid: 国内短信填空,默认未开通,如需开通请联系 [sms helper] */
        SenderId: phoneConfig.SenderId,
        /* 用户的 session 内容: 可以携带用户侧 ID 等上下文信息,server 会原样返回 */
        SessionContext: phoneConfig.SessionContext,
        /* 下发手机号码,采用 e.164 标准,+[国家或地区码][手机号]
         * 示例如:+8613711112222, 其中前面有一个+号 ,86为国家码,13711112222为手机号,最多不要超过200个手机号*/
        PhoneNumberSet: [`+86${phoneNo}`],
        /* 模板 ID: 必须填写已审核通过的模板 ID。模板ID可登录 [短信控制台] 查看 */
        TemplateID: phoneConfig.TemplateID[type],
        /* 模板参数: 若无模板参数,则设置为空*/
        TemplateParamSet: [phoneCode],
    }
    // 通过client对象调用想要访问的接口,需要传入请求对象以及响应回调函数
    return new Promise(function (resolve, reject) {
        // 通过 client 对象调用想要访问的接口,需要传入请求对象以及响应回调函数
        client.SendSms(smsParams, function (err, response) {
            // 请求异常返回,打印异常信息
            if (err) {
                reject({
                    code: 102,
                    info: 'get_fail',
                    data: {
                        info: '操作失败!',
                        detail: err
                    }
                });
            }
            resolve({
                code: 200,
                info: 'get_succ',
                data: {
                    info: '操作成功!',
                    response
                }
            });
        });
    })
}
2
3
4
5
6
7
8
9
10
11
12
13
14
15
16
17
18
19
20
21
22
23
24
25
26
27
28
29
30
31
32
33
34
35
36
37
38
39
40
41
42
43
44
45
46
47
48
49
50
51
52
53
54
55
56
57
58
59
60
61
62
63
64
65
66
67
68
69
70
71
72
73
74
75
76
77
78
79
80
81
82
83
84
85
86
87
88
89
90
91
92
93
94
# 验证码程序
# 图形验证码
写入以下代码:
const express = require('express');
const app = express();
const svgCaptcha = require('svg-captcha');
const config = require('../config');
const api = require('../api');

app.get('/svg', (req, res) => {

    // 创建图像
    const svgImg = svgCaptcha.create(config.svg);
    req.session.svgInfo = {
        code: svgImg.text,
        time: new Date().getTime(),
        isVerify: 0,
    };

    // 发送
    res.type('svg');
    res.status(200).send(svgImg.data);
});

app.post('/svg', (req, res) => {

    // 验证信息
    let svgInfo = {...req.session.svgInfo};
    let code = req.body.code;
    let verifyInfo = {
        code,
        time: new Date().getTime(),
    };

    // 检测信息
    return api.check(res, req, 'svg', svgInfo, verifyInfo);
});
2
3
4
5
6
7
8
9
10
11
12
13
14
15
16
17
18
19
20
21
22
23
24
25
26
27
28
29
30
31
32
33
34
# 邮箱验证码
const express = require('express');
const app = express();
const config = require('../config');
const api = require('../api');

app.get('/email', (req, res) => {

    // 验证参数
    let email = req.query.email;
    if (!email) {
        return res.json({
            code: 101,
            msg: 'get_fail',
            data: {
                info: '邮箱账号不能为空!'
            }
        })
    }


    // 邮箱配置
    let emailInfo = {...req.session.emailInfo};
    console.log('get email info:', emailInfo);
    let emailParams = {
        email,
        time: new Date().getTime(),
    };

    let emailConfig = config.email;
    let emailCode = (Math.random() * Math.pow(52, 2)).toString(36).slice(4, 10);

    let option = {
        from: `"前端实验室" <${emailConfig.from}>`,
        to: email,
        subject: '邮箱验证码',
        text: `尊敬的用户您好:您的邮箱验证码是${emailCode},有效期${emailConfig.time/60}分钟,请尽快使用!`,
        html: ''
    }

    // 邮箱验证码检测
    if (emailInfo &&
        email === emailInfo.email &&
        ((emailInfo.time - emailParams.time)/1000)  < emailConfig.time) {
        return res.json({
            code: 101,
            msg: 'get_fail',
            data: {
                info: '该邮箱验证码已发送!'
            }
        })
    } else {
        let emailInfo = {
            code: emailCode,
            email,
            time: new Date().getTime(),
            isVerify: 0,
        };
        console.log('save email info:', emailInfo);
        req.session.emailInfo = emailInfo;
    }

    // 发送邮件
    return api.sendMail(res, option);
});

app.post('/email', (req, res) => {
    let emailInfo = {
        ...req.session.emailInfo
    };
    let code = req.body.code;
    let email = req.body.email;
    let verifyInfo = {
        email,
        code,
        time: new Date().getTime(),
    };
    return api.check(res, req, 'email', emailInfo, verifyInfo);
});
2
3
4
5
6
7
8
9
10
11
12
13
14
15
16
17
18
19
20
21
22
23
24
25
26
27
28
29
30
31
32
33
34
35
36
37
38
39
40
41
42
43
44
45
46
47
48
49
50
51
52
53
54
55
56
57
58
59
60
61
62
63
64
65
66
67
68
69
70
71
72
73
74
75
76
77
78
# 手机验证码
const express = require('express');
const app = express();
const config = require('../config');
const api = require('../api');

app.get('/phone', async (req, res) => {
    // 验证参数
    let phone = req.query.phone;
    if (!phone) {
        return res.json({
            code: 101,
            msg: 'get_fail',
            data: {
                info: '手机账号不能为空!'
            }
        })
    }


    // 手机配置
    let phoneInfo = {...req.session.phoneInfo};
    console.log('get phone info:', phoneInfo);
    let phoneParams = {
        phone,
        time: new Date().getTime(),
    };

    let phoneConfig = config.phone;
    let phoneCode = Math.ceil(Math.random() * 1000000);

    // 手机验证码检测
    if (phoneInfo &&
        phone === phoneInfo.phone &&
        ((phoneInfo.time - phoneParams.time)/1000)  < phoneConfig.time) {
        return res.json({
            code: 101,
            msg: 'get_fail',
            data: {
                info: '该手机验证码已发送!'
            }
        })
    } else {
        let phoneInfo = {
            code: phoneCode,
            phone,
            time: new Date().getTime(),
            isVerify: 0,
        };
        console.log('save phone info:', phoneInfo);
        req.session.phoneInfo = phoneInfo;
    }

    // 发送手机
    let phoneSet = await api.sendSms(phone, 'eg', phoneCode);
    if (phoneSet.code === 200) {
        return res.json({
            code: 200,
            msg: 'get_succ',
            data: {
                info: '发送成功,请注意查收!',
                err: phoneSet.data.detail
            }
        })

    } else {
        return res.json({
            code: 101,
            msg: 'get_fail',
            data: {
                info: '发送失败,请重试!'
            }
        })
    }
});

app.post('/phone', (req, res) => {
    let phoneInfo = {
        ...req.session.phoneInfo
    };
    let code = req.body.code;
    let phone = req.body.phone;
    let verifyInfo = {
        phone,
        code,
        time: new Date().getTime(),
    };
    return api.check(res, req, 'phone', phoneInfo, verifyInfo);
});
2
3
4
5
6
7
8
9
10
11
12
13
14
15
16
17
18
19
20
21
22
23
24
25
26
27
28
29
30
31
32
33
34
35
36
37
38
39
40
41
42
43
44
45
46
47
48
49
50
51
52
53
54
55
56
57
58
59
60
61
62
63
64
65
66
67
68
69
70
71
72
73
74
75
76
77
78
79
80
81
82
83
84
85
86
87
88
# 在线体验
如果想要体验这个功能,这里有个小奇工具 (opens new window)应用,可以进行注册和登录以及图形、邮箱和手机验证。
# 写在最后
以上就是我开发的一些经验总结,如果有什么问题,请邮箱联系我,我一定抽出时间查看,不对的地方进行修正。


